Method 1: Windows 11 Startup Repair
The very first method involves using Windows Startup repair. This can fix any problem that your system may face while booting. To run Windows Startup repair, and fix the problem that you are facing, follow the steps given below-
1 How To Repair Windows 11 Automatic1.1 Method 1: Windows 11 Startup Repair1.2 Method 2: Windows 11 Restore1.3 Method 3: SFC Scan1.4 Method 4: Reset Your Windows 11 PC1.5 Final Words
- To run Windows startup repair, you will first have to access the advanced startup. Firstly turn off your PC. After turning the PC off, press the power button, and while the computer is still booting, press F11. This will lead you to an advanced startup.
- However, if this doesn’t work, you will have to interrupt the normal boot process a few times. Turn on your PC, and then turn it off when you see the Windows logo. Do this 4-5 times, and you will be able to enter Advanced Startup on your PC.
- If you can access the sign-in screen of Windows 11, then on the sign-in screen, click on the power icon. Then press the shift key on your keyboard, and while holding the key, click on the restart option. This will open Advanced Startup on your PC.
- Now in the advanced startup, select the troubleshoot option and then choose advanced options. In the advanced options, choose startup repair to launch Windows Startup Repair.
After doing so, Windows Startup Repair will start diagnosing your PC. This should most probably fix any startup issue you face. Do note that this method will only fix any issue you face during the startup. If you don’t face any startup problems, then this option might not work for you.
Method 2: Windows 11 Restore
Another way to repair Windows 11 is using Windows Restore. Using Windows Restore, you can revert to when your Windows was working without any problem. However, to continue with this method, you need to have created a restore point earlier. If you have not created a restore point earlier, this method won’t work for you, and you can move to the next method. How to use Windows 11 system restore is a specific guide that we have designed. As a result, you can follow this tutorial to obtain a better understanding.
If you have created a restore point, and you want to restore your PC, then you can follow the steps given below-
Access the advanced startup. We have already discussed in the above steps that how you can enter the advanced startup.In the advanced startup, select troubleshoot option. In the troubleshooting, choose advanced options.Now select system restore. This will reboot your PC.You will be asked to select your account and then verify your account using your set password.Then you will have to select the restore point to which you want to revert back to. After selecting the restore point, click on scan for the affected program. This will show you what programs will be added to your system or what programs will be removed.Close the current window showing the affected programs, and click on next. Follow the on-screen instructions to restore your Windows.
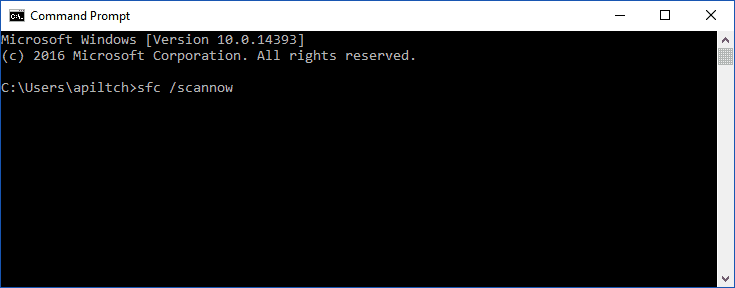
Method 3: SFC Scan
You can perform an SFC scan to check for any corrupted files and repair them. You can do this by accessing the safe mode on your PC. 2. In the advanced startup, select troubleshoot and then select advanced options. 3. Now in the advanced options, select the startup settings and then click on the restart to restart your PC. 4. When your PC restarts, you will see a list of options. You will get the option to access safe mode here. 5. Upon accessing the safe mode, open the start menu and search for the command prompt. Run the command prompt as administrator. 6. In the command prompt, type in the command sfc /scannow and execute it.
This will fix any corrupt files that might be causing the problem.
Method 4: Reset Your Windows 11 PC
If any of the above methods didn’t work, then you can reset your PC. Resetting will remove all the data on your PC, so ensure that you have a backup before you continue resetting your PC to repair Windows 11.
To reset your PC, head to the advanced startup, and then select troubleshoot. Now in the troubleshoot, select Reset this PC.
This will start resetting your PC. Your PC might restart several times during the process.Once the process is completed, you will have to set up Windows 11. Once you do that, you will be able to use your PC without any problem.
READ MORE:
How To Turn Off Automatic Updates On Windows 11How to Fix Windows 11 Widgets Not Working ProperlyHow to Run as Administrator Windows 11
Final Words
These were some methods to help you repair Windows 11. If you face any problem with your system, you can follow any of the above methods to resolve your face. Before you get started, make sure you have a power backup in case the electricity goes off while you are repairing your Windows PC.
Δ