Android devices have the most interesting operating system in them. And this operating system keeps getting upgraded from time to time. Each upgrade comes with a whole set of newly added features and an even better user interface. Hence, every Android user wishes to upgrade to the latest version of the operating system on their Android devices.Indeed, The latest Android Oreo 8.O is one of the latest upgrades by Google itself. The Android operating system started from cupcake and has now reached Android Nougat to Android Oreo. Nougat is currently the latest version of the Android operating system. Thus, it is the dream of many Android users to upgrade their Android devices to Android Nougat even before it is allotted to them. The version before Nougat was Marshmallow which was numbered as 6. The Nougat version is numbered as. 7. Hence, we are going to discuss the method and the steps required to install Android Nougat which is Android 7.1 on any Android device. However, In Most of the smartphones, Nougat is currently the latest version of the Android operating system. But, Smartphone companies sooner going to launch their brand new Android Oreo on their upcoming smartphones. Thus, it is the dream of many Android users to upgrade their Android devices to Android Nougat even before it is allotted to them. The version before Nougat was Marshmallow which was numbered as 6. The Nougat version is numbered as. 7. Hence, we are going to discuss the method and the steps required to install Android Nougat which is Android 7.1 and Android Oreo which in 8.O on any Android device.
Requirements:
Since prerequisites:
0.1 Requirements: 1 Steps To Install Android Oreo 8 and Android Nougat 7?1.1 Step #1 Choose an appropriate Custom ROM and GApps package1.2 Step#2 Flashing your Android device with the Custom ROM
- You will be needing an unlocked bootloader or root access.
- A custom recovery (TWRP, or CWM).
- You will also have to get a Custom ROM to flash your Android device which has the stock ROM.
Steps To Install Android Oreo 8 and Android Nougat 7?
Now, let’s understand the steps in detail.
Step #1 Choose an appropriate Custom ROM and GApps package
Since the Custom ROMs are built unique for every Android device, it is essential for you to select the Custom ROM which is designed for your Android device only. XDA Developers are the best developers of Custom ROMs for almost every Android device. You will find its page on Google where the Custom ROMs which support Android Nougat for various Android devices will be listed. There are other developers too such as Cyanogen mod who develop such Custom ROMs for you. You can check them out and get the best Custom ROM for your Android device. Once you choose the Custom ROM for your Android device,
Step#2 Flashing your Android device with the Custom ROM
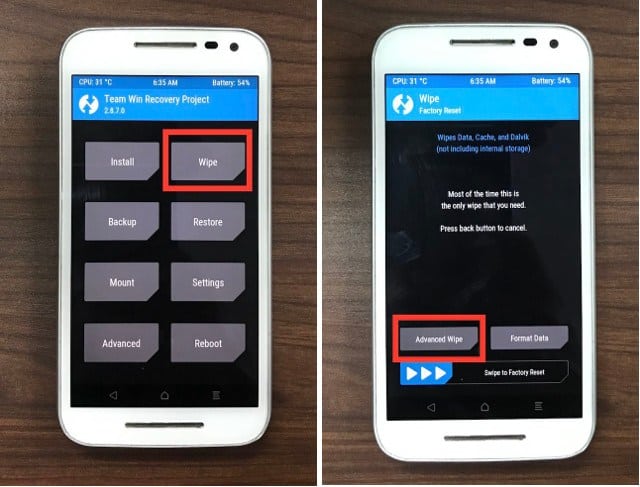
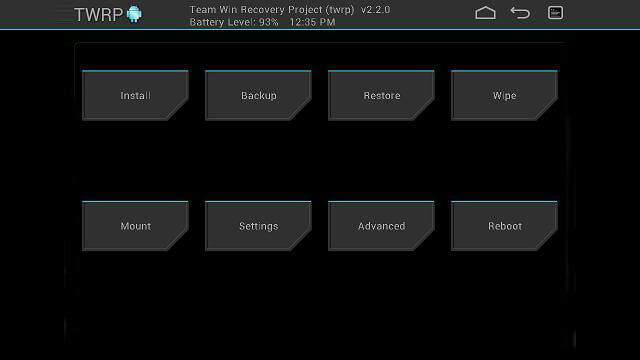
Once you have downloaded the required files on your Android device, turn off your device and enter into the recovery mode. You can do this by holding down the power button and volume up button simultaneously for a few seconds. Once you have successfully entered the recovery mode, follow the steps mentioned below to flash your Android device with the Custom ROM. Step 1- Select ‘Wipe‘ from the list and then select ‘Advanced Wipe‘ in the next window. Step 2- Select various partitions as per your wish and then swipe right on the option to confirm the partitions. Step 3- When you are done, navigate to the TWRP home screen, and tap on Install. Then, scroll down on the list, select the file of the Custom ROM which you had downloaded on your Android device. Step 4- Once you are done with the above step, you are almost through. Now, all you need to do is confirm the changes you have to make and in the process of flashing your Android device will begin. Step 5- After this, you now need to flash the GApps which you had downloaded on your Android device. You have to follow the same steps as you did for flashing the Custom ROM on your Android device. Step 6- That’s all you need to do from your side. Now, reboot your Android device and wait patiently till it gets completely booted up. It might take some time due to the newly installed updates. Step 7- Once your device boots up successfully, you will have to set it up just like you set up a new Android device. But, the difference will be that you’re a merits device will now be running on Android Nougat. Note: While flashing a Custom ROM on your Android device, things might go wrong and your device might get bricked or get stuck in a boot-loop. We are not responsible if you face any such issue while flashing your Android device. You must read all the disclaimers before you execute this method. Wrap Up: Using this method, you can download and install any Android Nougat and Android Oreo 8.0 on any Android device. The only point of caution in this method is while choosing an appropriate Custom ROM and GApps package for your particular Android device. Rest of the steps are quite easy to execute. If you get stuck at any of the above-mentioned steps or if you have a better method to do the same task, then please let us know in the comments section below.