Thus, here we are with some of the best methods which you can use to fix keyboard not working error on Windows 10. There are several reasons due to which this error occurs on your PC. Start executing the methods listed below and work your way down the list until the error is fixed.
1 Fix Windows 10 Keyboard Stopped Typing & Working 20211.1 Method 1: Some Basic Checks.1.2 Method 2: Turn off the Filter Keys.1.3 Method 3: Reinstall and Update your Keyboard Drivers.1.4 Method 4: Disable the ‘Allow the computer to turn off this device to save power option.1.5 Method 5: Disable Fast Startup.1.6 Method 6: Use Keyboard Troubleshooter.1.7 Conclusion:
Method 1: Some Basic Checks.
Before starting with the technical methods, let us make some basic checks to ensure that your keyboard is in working condition.
- Look for any kind of physical damage to your keyboard or the connecting cables. If there is any damage, reach out to a technician.
- Connect your keyboard to other USB ports on your PC and check if the error persists.
- If you have a wireless keyboard, check if it is sufficiently charged and the wireless adapter is properly connected. Change the batteries on your wireless keyboard if required.
- If all the points listed above are checked, try using your keyboard on a different Windows 10 PC. If your keyboard works fine on the other PC, start executing the methods listed below. ALSO CHECK: Yourphone.exe in Windows 10 – Here’s How to Disable/Uninstall it
Method 2: Turn off the Filter Keys.
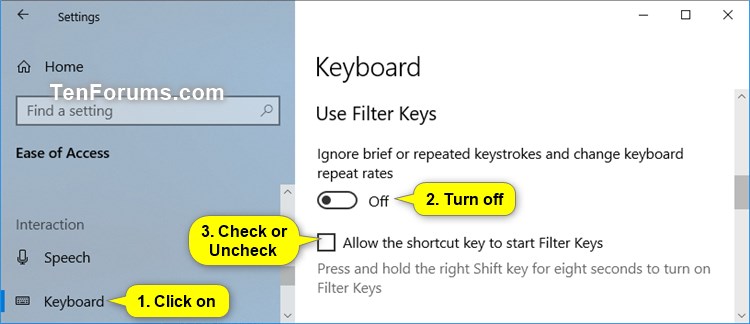
It has been reported by several Windows 10 users that the Keyboard Not Working error gets fixed on turning off the Filter Keys. Follow the steps listed below to do so. Step 1- Click on the Start icon located at the bottom left corner of your desktop and click on ‘Settings‘ to open it. Step 2- Here, click on the ‘Ease of Access‘ option from the grid. Step 3- Now, click on ‘Keyboard‘ from the left pane of the window. Step 4- In the Keyboard tab, search for the ‘Use Filter Keys‘ section and turn off its toggle. Now, check if your keyboard starts working on your Windows 10 PC. If not, go ahead with the next method.
Method 3: Reinstall and Update your Keyboard Drivers.
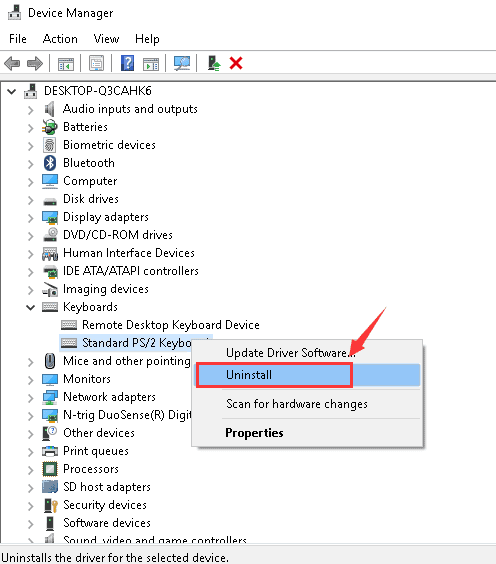
The keyboard not working error is often caused due to outdated keyboard drivers. Follow the steps listed below to reinstall updated keyboard drivers on your Windows 10 PC. Step 1- Launch Device Manager on your Windows 10 PC. Step 2- Expand ‘Keyboards‘ by clicking on the arrow next to it. Step 3- Right-click on your keyboard driver and select ‘Uninstall Device‘ from the drop-down box.
Step 4- Now, restart your PC. Your keyboard driver will be automatically installed. Now, check if the keyboard not working error has been fixed. If not, try manually updating your keyboard driver. To manually update your keyboard drivers, execute step 1 and step 2 from the method listed above. Then, select the ‘Update driver option from the drop-down box in step 3. Your PC will ask for permission to search automatically for updated driver software. Allow this request and then, follow the on-screen instructions. Your PC must have access to the internet to automatically update its keyboard drivers.
Method 4: Disable the ‘Allow the computer to turn off this device to save power option.
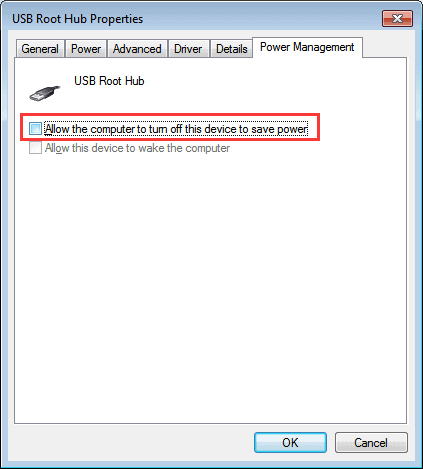
In Windows 10, there is an option in Power Management Settings which allows it to disable the peripheral devices such as your keyboard. Follow the steps listed below to disable this option. Step 1- Launch Device Manager on your Windows 10 PC. Step 2- Expand the ‘Universal Serial Bus controller‘ by clicking on the arrow next to it. Step 3- Double-click on the USB on which your keyboard is connected. It will open its Properties window. Step 4- Here, go to the ‘Power Management‘ tab and uncheck the box for ‘Allow the computer to turn off this device to save power and restart your PC.
The Keyboard Not Working error should get fixed on your Windows 10 PC. If not, go to the next method.
Method 5: Disable Fast Startup.
It has been reported by several Windows 10 users that disabling the Fast Startup can fix the keyboard not working error. Follow the steps listed below to execute this method. Step 1- Launch Control Panel on your Windows PC. Step 2- Search and click on Hardware and Sound » Power Options. Step 3- Click on the ‘Choose what the power buttons do‘ option located on the left pane of this window. Step 4- On the new window, search and click on the ‘Change settings that are currently unavailable link.
Step 5- Now, uncheck the checkbox for ‘Turn on fast startup‘ and click on the ‘Save Changes‘ option. Now, restart your device and check if your keyboard starts functioning normally.
Method 6: Use Keyboard Troubleshooter.
If none of the above-listed methods could fix the keyboard not working error on your Windows 10 PC, try using the inbuilt troubleshooter. Step 1- Click on the Start icon located at the bottom left corner of your desktop and click on ‘Settings‘ to open it. Step 2- Search and click on the ‘Find and fix keyboard problems‘ option. You can use the on-screen keyboard to type it in the search bar.
Step 3- Click on the ‘Next‘ button to initiate the keyboard troubleshooter. Step 4- Any possible issue causing the keyboard not working error on your Windows 10 PC will be identified. Follow the on-screen instructions to fix the identified issues and thereby fix the keyboard not working error. ALSO CHECK: How to Get Printer Online on Windows 10
Conclusion:
These are some of the most useful methods which you can execute to fix keyboard not working error on your Windows 10 PC. If none of the above-listed methods prove to be useful, you can replace the keyboard or approach a technician. If we have missed out on anything or you still have any questions regarding this post feel free to ask them in the comment section.
Δ


